Blog Image

The next eshine telescope

Design ideas and tests for a new generation of automatic earthshine telescope

What did we learn from the first try?

iBoot alternative

Non-camera electronics, Starting up Posted on Sat, November 02, 2013 12:26:18

Instead of the large and expensive iBoot bar we have, any future system we build might be able to make do with this sort of thing:

https://www.m.nu/wall-plug-p-798.html

One of these are needed:

https://www.m.nu/razberry-p-790.html

I think it is a way to control power over the internet.

More here: http://razberry.z-wave.me/


New telescope designs

Optics Posted on Tue, October 29, 2013 14:31:08

An interesting paper

describes a new design for an earthshine telescope. They describe the essential instrument.
It seems to me that:

1) they only have 2 lenses (although both are doublets – we have one doublet and two singlets)
2) Their masks (like our SKE) sits outside the telescope. At least, that makes it easier to fix when it breaks.
3) Their telescope is a Cassegrain system – so lots of optics there…

Hmm. We should try to understand this design in case we want to try fresh approaches. Perhaps it is an option for a FW-less CMOS-based system?

It seems their ‘instrument’ sits on a conventional telescope – so many many optical surfaces in total…


First eshine telescope

Pointing Posted on Mon, October 28, 2013 16:33:10

In our very first eshine teleeescope (the 0’th) which went to La Palma for testing, we had placed the knife-edge on the surface of the CCD and did prime-focus imaging. We could control the pointing with software (clicks on a star atlas) and could rotate the camera in its ball-bearings so that the knife-edge was aligned as required.

With a somewhat larger CCD or CMOS, higher pixel count and an image scale that allowed the Moon to be well imaged in the half that was not covered by knife-edge we might be able to design a system with minimal movable parts – just the mount to point and a motor to rotate the camera. No secondary optics (we would not need a colour FW as we would be using a modified RGB CMOS). No shutter (provided CMOSs read out really fast so that there is no ‘dragging’).

We could go back and inspect our La Palma images – most of them were made with an attempt at the SKE.


Raspberry Pi telescope control

Software Posted on Sun, October 20, 2013 10:09:51

People are working on using a small RPi computer to control a telescope:

http://www.stellarium.org/wiki/index.php/Telescope_Control_%28client-server%29

Even using the new Pi camera board to take astro-images:

http://www.raspberrypi.org/archives/4170
http://zeusbox.net/blog/2013/05/raspberrypi-camera-board/


DIY telescope-control project using Arduino

Automation Posted on Sun, October 20, 2013 09:24:56

Here is someone who has used an Arduino to control a telescope. His idea is to replace stepper motors and use ‘good’ DC motors. He still uses LX200 commands from planetarium software. The software talks to the Arduino which talks to the motors.

Perhaps these ideas can be used to make a system that uses cameras to find the target (Moon) and track it – in a way simpler than this mans system: No GOTO commands – just a small PC or Arduino controlling motors until some target distance is minimized. Using an equatorial mount allows easier tracking once the target is acquired – just one motor spinning.

This guy’s mount has to do meridian flips – probably has code in the Arduino for that. If a fork EQ-mount was used (like on a Celestron or Meade) MFs could be avoided.


More on testing DSLR RGB halos

CCD Posted on Sat, October 19, 2013 12:22:24

We test Hans’ 450D optics by imaging the Full Moon (t_exp = 0.02 s, f=5.6, focal length=300 mm (i.e. tele-lens)). Using IRIS to extract the R G and B fields we align, normalize and average these and plot the profile from Moon disc centre and out into the halo. We get:
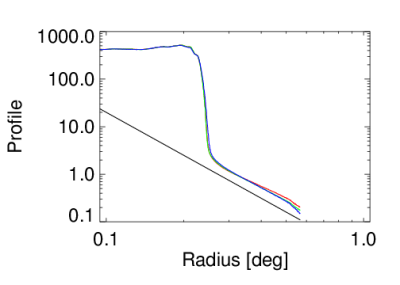

The red, green and blue curves represent the halo in R G and B, respectively. The black line is a 1/r³ curve. R, G and B images normalized by their total flux before plotting.

It would seem that, as in the case of the image found on the internet, the profiles of R G and B are very similar, and also of ‘high quality’ – i.e. they are almost at the limit of what is possible in terms of dropoff slope.

This has bearing on choice of future cameras – CMOS or filtered CCD. I think the similarity of the profiles is due to the light having traversed the same optics – which is not the case with the filter-wheel.

I am not sure why the profiles are so close to 1/r³. It seems our optics in the MLO telescope cannot match this.

It should be said that the DSLR optics show ghosting – this can interfere with the DS photometry if unluckily placed – but apparently does not gives us shallow halo profiles.
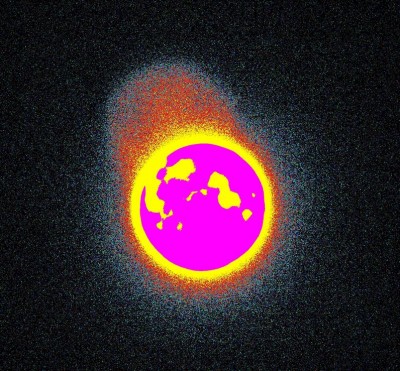
The ghost image (same size as Moon, positioned at 11 o’clock) is due to internal reflections in the compact tele-lens used. Perhaps an image of the Moon is reflected from the CMOS surface, reflects off the back of the optics and is recorded. The above ghost would be very intense compared to the DS. Similar ghosts are seen in the wide-angle lens image taken with the Sigma camera, but as magnification is less the ghost is easily placed away from the Moon.

One thing to notice is the 2-orders of magnitude of drop in intensity from the disc brightness to the start of the halo – is this what we get with our MLO telescope? Perhaps the 1/r³ drop is an artifact of a high starting level? Need to check that.


Testing CR2 and X3F files

CCD Posted on Sat, October 19, 2013 09:31:05

IRIS is a piece of Windows software that will readily convert CR2 files into FITS files. It can be done via pull-down menus or via ‘scripts’

A typical script is:

loadcam IMG_7536
save IMG_7536
loadcam IMG_7537
save IMG_7537
loadcam IMG_7538
save IMG_7538
loadcam IMG_7539
save IMG_7539
loadcam IMG_7540
save IMG_7540

Image files named IMG_XXXX.CR2 are here being loaded and saved as 16-bit FITS named IMG_XXXX.fit

It is necessary to first, via pull-down menus, set up IRIS to expect a Canon EOS camera (hence it understands to look for CR2 files in the script). You must also set the paths (in Settings…) to where the data are and where the scripts are. When you want to process .X3F images you must pick the SIGMA SD10 camera from the ‘camera’ menu in IRIS.

The script is a text file with extention ‘.pgm’ and is run from the ‘console’ in IRIS – this is the 11th icon along the toolbar. Simply write

RUN nameofscript (omit the .pgm, apparently)

and it will run, saving files for you.

X3F files are not yet understood – IRIS will open a file and save a FITS but there is only one ‘colour-plane’ in the FITS file – in the CR2 files converted above we get 3.

IRIS can be run from ‘wine’ in Ubuntu.


LX200 emulator

Software Posted on Fri, October 18, 2013 08:29:57

Realistically, we will always be working on telescope mounts that follow something like the LX-200 command set. In order to develop a system for pointing control it may be useful to have a telescope emulator – which this is:

http://miltonhill.us/software/index.html

It is Windows … wonder if there is something similar for Linux?
——————————-
Here is something interesting: http://astropix.nl/astro/LX200.htm Seems like a piece of hardware between a webcam and your telescope. Not free – costs ~100 Euro.
——————————-
This is something that allows tracking satellites which, like the Moon, do not move at a fixed rate: http://eq-mod.sourceforge.net/lxindex.html
——————————-

My problem with all of the above is that they require the mount to be ‘initialized’ before use – i.e. human intervention is needed after a system crash. No good for truly automatic systems. We need something that looks on the sky, finds the Moon, aligns on it, and starts tracking. I do not believe this exists, but we tested, by hand, all components on the MLO system. For Celestron telescopes there is something very interesting:

http://www.celestron.com/astronomy/celestron-starsense-accessory.html


« PreviousNext »